

Master OpenAPI Specification and Auto-Generate Beautiful API Documentation
Introduction: API Documentation That Doesn’t Suck
Picture this: You’ve built an amazing Go API. The endpoints work flawlessly. But your frontend developers are frustrated because documentation is scattered across old Wiki pages, outdated README files, and Slack messages from six months ago. This is the life without proper API documentation.
API documentation is not a nice-to-have, it’s essential. It’s the contract between your backend and everyone who consumes it. Poor documentation leads to wasted hours debugging, support tickets, and frustrated developers. Good documentation saves time, reduces errors, and makes your API feel professional and trustworthy.
Enter Swagger (OpenAPI): The Industry Standard for API Documentation. Swagger is a specification for describing REST APIs in a machine-readable format. It’s become the de facto standard across the industry, and for good reason.
In this comprehensive guide, we’ll walk through everything you need to know about creating complete Swagger documentation for your Go APIs, from setup to advanced features.
Why Swagger Matters
| Benefit | Description |
| Interactive UI | Swagger UI provides an interactive interface to test API endpoints directly |
| Auto-Generated | No need to write docs manually – generate from code comments |
| Client Libraries | Automatically generate client SDKs in multiple languages |
| Standardization | Follow industry standards that developers already understand |
| Version Control | Track API changes and maintain multiple API versions |
Part 1: Understanding Swagger and OpenAPI
Let’s start with terminology. Swagger and OpenAPI are often used interchangeably, but there’s a slight distinction:
Swagger: The original specification created by SmartBear. It’s a tool and ecosystem for API documentation.
OpenAPI: The standardized specification (Swagger 3.0 and beyond). It’s maintained by the Linux Foundation and is more comprehensive.
For practical purposes, when someone says ‘use Swagger’ they usually mean ‘use OpenAPI specification with Swagger tools’. The most common tool for Go developers is Swag, which generates OpenAPI specification from code comments.
Here’s what a Swagger/OpenAPI document looks like at a high level:
openapi: 3.0.0
info:
  title: My Awesome API
  version: "1.0.0"
servers:
  - url: https://api.example.com
paths:
  /users: …
This YAML structure describes your entire API in a standardized format that tools can parse and visualize.
Part 2: Setting Up Swagger in Your Go Project
Let’s get practical. To add Swagger documentation to your Go API, you’ll use Swag, a tool that generates OpenAPI specification from comments in your code.
Step 1: Install Swag
go install github.com/swaggo/swag/cmd/swag@latest Step 2: Install Gin Swagger Middleware
go get -u github.com/swaggo/gin-swagger Step 3: Add Swagger Comments to Your Main Function
// @title My Awesome API
// @version 1.0
// @description This is a sample API server.
// @host localhost:8080
// @basePath /api/v1
func main() {
r := gin.Default()
r.GET("/swagger/*any", ginSwagger.WrapHandler(swaggerFiles.Handler))
}
Step 4: Generate Swagger Documentation
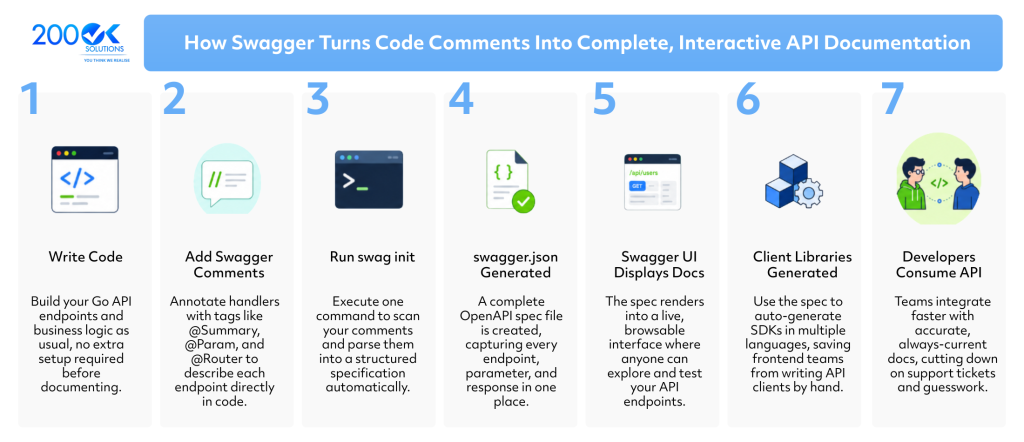
swag init Run this command in your project root. Swag will scan your code, parse the comments, and generate a docs/ folder with swagger.json and swagger.yaml files.
Part 3: Documenting Your Endpoints
Now comes the fun part, documenting individual endpoints. Here’s what a well-documented endpoint looks like:
// @Summary Get all users
// @Description Retrieve a paginated list of all users
// @Tags users
// @Accept json
// @Produce json
// @Param page query int false "Page number" default(1)
// @Param limit query int false "Results per page" default(10)
// @Success 200 {array} User "Users found"
// @Failure 400 {object} ErrorResponse "Invalid query parameters"
// @Router /users [get]
func GetUsers(c *gin.Context) {
// implementation here
}
Let’s break down what each annotation does:
Common Swagger Annotations Explained
| Annotation | Purpose | Example |
| @Summary | Brief description of endpoint | Get all users |
| @Description | Detailed description | Retrieve paginated list… |
| @Tags | Group related endpoints | users, admin |
| @Param | Define query/path parameters | page query int false |
| @Success | Define success response | 200 {object} User |
| @Failure | Define error response | 400 {object} Error |
| @Router | Specify route and method | /users [get] |
Part 4: Documenting Request/Response Models
Your endpoints don’t exist in isolation, they consume and produce data structures. Documenting these models is crucial for API consumers. In Swagger, you do this through struct tags and comments.
type User struct {
  // User ID
  ID int `json:"id" example:"1"`
  // User's full name
  Name string `json:"name" example:"John Doe"`
  // User's email address
  Email string `json:"email" example:"john@example.com"`
  // User's account status
  Status string `json:"status" enum:"active,inactive,banned"`
}
The comments above each field appear in the Swagger UI. The `example` and `enum` tags provide additional information. Now, when someone views your API documentation, they don’t just see ‘Name: string’, they see ‘Name: John Doe’ and understand what the field represents.
Part 5: Adding Security Schemes
Most real-world APIs require authentication. Documenting this in Swagger is essential. You can define security schemes at the API level and apply them to specific endpoints.
// @securityDefinitions.apikey ApiKeyAuth
// @in header
// @name Authorization
Then on a protected endpoint:
// @Security ApiKeyAuth
// @Router /admin/users [get]
You can also use Bearer tokens (for JWT) or OAuth2:
// @securityDefinitions.bearer Bearer
// @in header
// @name Authorization
// @description Type "Bearer" followed by a space and JWT token.
You can also use Bearer tokens (for JWT) or OAuth2:
// @securityDefinitions.bearer Bearer
// @in header
// @name Authorization
// @description Type "Bearer" followed by a space and JWT token.
When API consumers view your documentation, they’ll see that certain endpoints require authentication and understand exactly how to provide credentials.
Complete Documentation Workflow
Part 6: Swagger Documentation Best Practices
Be Descriptive, Not Just Technical: Write descriptions like you’re explaining to a human, not a machine. Instead of ‘Get user by ID’, write ‘Retrieve detailed information about a specific user, including their profile, preferences, and activity history.’
Include Real Examples: Use the example tag liberally. Real data makes documentation more concrete and useful. Show what success looks like, what fields are required, and what optional fields might contain.
Document Error Responses: Don’t just document the happy path. Every endpoint should document potential error responses. What happens if a user is not found? What’s the error response format?
Version Your API: Use versioning in your paths (/api/v1/, /api/v2/). Document which versions are deprecated and guide users toward newer versions.
Keep It DRY: Don’t repeat documentation in code comments and Swagger tags. Use Swagger tags as the source of truth for API documentation.
Test Your Documentation: Actually test the examples in your Swagger UI. Make sure the response examples match what the endpoint actually returns. Nothing worse than documentation that doesn’t match reality.
Update as You Evolve: When you add a new endpoint or change parameters, update your Swagger comments immediately. Documentation debt is just as bad as code debt.
Part 7: Advanced Swagger Features
Swagger/OpenAPI supports some powerful features worth knowing:
Multiple Response Types: Some endpoints might return different data based on parameters. You can document multiple response types:
// @Success 200 {object} User "Returns single user"
// @Success 200 {array} User "Returns array of users"
Deprecated Endpoints: Mark old endpoints so clients know to migrate:
// @Deprecated
// @Router /users/old-method [post]
Request Body Documentation: For POST/PUT endpoints, document the request body structure:
// @Param request body CreateUserRequest true "User data" Query Parameter Validation: Document constraints on query parameters:
// @Param limit query int false "Results per page" minimum(1) maximum(100) default(10) Part 8: The Swagger Ecosystem
Once you have your Swagger/OpenAPI specification, you unlock an entire ecosystem of tools:
Tools and Services Available from OpenAPI Spec
| Tool | Purpose | What It Does |
| Swagger UI | Interactive Documentation | Beautiful, interactive web interface to explore and test APIs |
| Swagger Editor | Spec Management | Write and validate OpenAPI specs with real-time preview |
| OpenAPI Generator | Client/Server Generation | Generate client libraries in 50+ languages from your spec |
| Postman | API Testing | Import your spec and generate automated test collections |
| Swagger Codegen | Code Generation | Generate boilerplate code for servers and clients |
| Stoplight | API Governance | Design, mock, and validate APIs at scale |
The beauty is that once you have a valid OpenAPI spec, any of these tools can work with it. Your documentation becomes a bridge between your implementation and the entire ecosystem.
Part 9: Complete Real-World Example
Let’s look at a realistic, complete example. Say you have a blog API with users and posts:
// @title Blog API
// @version 1.0.0
// @description A RESTful API for managing blog posts and users
// @host api.blog.example.com
// @basePath /v1
// @securityDefinitions.bearer Bearer
// @in header
// @name Authorization
func main() { ... }
Then your endpoint:
// @Summary Get blog post by ID
// @Description Retrieve the full content of a published blog post with author information
// @Tags posts
// @Accept json
// @Produce json
// @Param id path int true "Post ID"
// @Success 200 {object} PostDetailResponse "Post found"
// @Failure 404 {object} ErrorResponse "Post not found"
// @Router /posts/{id} [get]
func GetPost(c *gin.Context) { ... }
Conclusion: Make Your API Developer-Friendly
Good API documentation is a superpower. It reduces support overhead, speeds up onboarding, and makes your API genuinely enjoyable to work with. Swagger and OpenAPI make this easier than ever, especially in Go with the Swag tool.
The investment you make in documenting your API pays dividends immediately. Your frontend team spends less time asking questions. New team members come up to speed faster. Consumers of your API have confidence they understand how to use it correctly.
Start with a simple endpoint, add Swagger comments, run swag init, and see your documentation come to life. Once you experience the power of auto-generated, interactive API documentation, you’ll never go back to manual docs.
Your API deserves great documentation. Your users deserve to understand how to use it. Make it happen with Swagger.
You may also like : Go vs Node.js